Moldy VHS Tapes (And How To Effectively Clean Them)
Moldy VHS Tapes (And How To Clean Them)
As much as I love VHS tapes, they have one major shortcoming: degradation. The sad truth about the videocassette is that it's a fragile beast, and no matter how rarely you play a tape or how well you try to preserve it, that tape will eventually reach the point of unplayability, whether it becomes worn out from repeated playback or is plainly and simply destroyed over time, just as all physical entities are over decades, centuries and longer.
The topic of this post encompasses the latter form of VHS decay- gradual, natural destruction, and a particularly fiendish form of it, an acceleration of said destruction caused by certain environmental conditions that's as dastardly as it is disgusting. It's a happenstance which somewhat ironically brings about the death of media through the spread of life, yet one which can also be somewhat fought back against through proper techniques.
 | ||
| *Gasp* THE HORROR! | |
Usually, the presence of mold is immediately noticeable in any VHS tape. When looking through the clear window on the tape's shell, it can be seen in the form of a white, cloudy-looking substance covering the surface of the tape of itself and the surrounding area. There might be a little of it, or there might a lot of it; either way, its presence pretty much compromises any immediate playability, as trying to play a moldy VHS in a VCR, naturally, results in a moldy VCR. More specifically, it results in the mold spreading onto the tape heads inside of the VCR, which not only inhibits the machine's ability to read tapes, but will probably result in the mold spreading even further if more are played inside the dirty machine. In other words, even the slightest bit of mold in a VHS tape can pretty much compromise an entire collection.
 |
| One of the rarer titles I've cleaned. Also the one with the most nudity! |
Incidentally, I recently secured a collection of fairly moldy anime tapes which I'm in the process of cleaning one-by-one, and as I did so I figured I'd give a step-by-step breakdown of my process, complete with reference pictures of the tapes in question. Here, you'll learn various methods of how to clean a VHS, as well as how to take a VHS apart and how to clean the inside of your VCR. Let's begin.
A Quick Disclaimer
Now, before I get into things, I do want to address the fact that these methods involve using rubbing alcohol, which one might have reservations about putting into direct contact with magnetic tape in the ways that I'm about to describe. Personally, I've done so multiple times over the past year with multiple tapes, and never had any major issues. Usually with these totally jacked-up tapes, the video and audio are both a little messed up in some spots, usually at the very start and sometimes near the end of the tape, but I'd presume that's just normal wear and maybe damage from the mold rather than from the alcohol.
I've read a few sources which claim that rubbing alcohol wears away at the magnetic layer on the tape, which of course affects its readability, but even if that's the case, it's clearly less detrimental than it is to let the tape continue festering in mold. As a whole, all of my cleaned tapes play just fine from start-to-finish after having been wiped pretty well.
That said, I've only used these methods to clean commercial tapes- that is to say, home media releases which are maybe rare, but not necessarily unique and with at least a few other copies in circulation. If you have something more unique and one-of-a-kind you wanna clean, such as a blank tape with a TV recording or a cherished family moment, it might not be a bad idea to seek out professional help rather than handling it yourself. Even if isopropyl doesn't damage VHS tapes (which I'm not saying definitively), handling tapes by-hand can lead to other forms of damage if you don't handle it carefully and slip up- stuff like crinkling the tape up which causes it to play back less smoothly.
If you do enough searching, you can probably find a company that specializes in cleaning tapes and does so in a far more careful manner. Off the top of my head, this company seems to offer cleaning services for a pretty affordable price of $5-15 per tape, and even offers to transfer them digitally for an additional fee. I haven't looked too deeply into them, but they're definitely worth checking out if you have something more special that you want to preserve. There are also plenty of other places you could look into for similar services, including possibly some that are local to where you live.
Ultimately, it's up to you. I've never had any blank tapes I've had to clean and only ever dealt with rare, commercially released stuff, but personally I would never trust myself with the deed of cleaning something so special, even if I had years of practice under my belt, and would probably get it done professionally. But like I said, it's really up to you how you wanna go about doing it.
Well, with that out of the way, let's get into the grime and discuss some of the methods I've used.
What You'll Need
 |
| Your arsenal of tools. |
As I established, there are a number of different methods for cleaning your VHS tapes, but the majority of them use one particular substance: isopropyl alcohol. I've seen one tutorial video where the person in question used Dawn dish soap, which might or might not also work, but I choose to stick with rubbing alcohol as it evaporates quickly and works perfectly as a mold destroyer. You'll want to use a higher percentage- I used to use 70% alcohol which didn't necessarily not work, but these have a higher volume of water in them which means it might not evaporate as quickly. Now I use 91% alcohol, which smells rancid and dries your hands out but is probably more effective than that 70% stuff was.
Another thing I recommend using regardless of your cleaning method is one or two rubber gloves. These aren't necessary, per se, but I think they're a good idea to have for several reasons:
- They protect your hands from the rubbing alcohol which will dry them out and inflame any cuts you have.
- If you ever have to touch the tape directly, you'll avoid getting your oily fingers all over it and causing damage.
- Several of these methods involve putting your hands inside of a running VCR, which of course poses the risk of electrical shock if you aren't careful; rubber gloves will prevent this from happening, so you should absolutely wear them if you're cleaning your tapes in any of these manners.
Unless you're doing things entirely by-hand, chances are you'll be needing to use a VCR for most of your work. If this is the case, I'd recommend using an extra VCR rather than the same one you watch tapes with. This is because, undeniably, you'll probably be getting the machine dirty in the process of cleaning, so it isn't advisable to watch tapes in it after using it for cleaning purposes. I have an extra Panasonic VCR which I've used for cleaning lately, but I'd recommend using something crappy and low-end- go to your local thrift store and look for a cheap machine, which can then be your cleaning vessel for years to come.
Whether or not you use a second VCR, you're gonna wanna clean it as well after you're done as well as in-between the different steps. I'll get into steps for this later on, but just know that it's incredibly simple and a must-do every single time you clean a tape.
Finally, there's the most important part- the weapon of choice, or in other words, a cleaning utensil. If you're gonna clean a VHS tape, you've gotta have some kind of utensil you can use to get the job done. There are a number of options in this regard; some people use Q-Tips, while others opt for a fine cloth. For the latter, you want something baby soft- not anything like a paper towel or a washcloth which is far too coarse and will undeniably scratch up the tape. I personally use a small microfiber cloth, like the ones you clean glasses or phone screens with. These get the job done and aren't too rough on the tape itself, so I think they're perfect for the job.
Ah, Ze Workspace
As a quick aside, location is also important- after all, you don't want to handle mold and rubbing alcohol in a stuffy bedroom environment. Undeniably the best place to do this stuff is outside in the fresh air, but if this isn't possible then do it in a large, well-ventilated room, preferably with hardwood flooring and access to a sink.
My choice of locale is usually our upstairs bathroom, which on top of being a pretty large space has two sinks, a large counter-top for working on, and a big-ass window which can be opened in case of severe stuffiness. This is still not preferable to working outdoors, but either way make sure not to do in a small room with no windows or vents, as small rooms plus mold lends itself to bad times. Another good option is a basement if you have one, but in that case I'd wear something like a mask since there still probably aren't any windows.
The Quickest Method: Rewind-Scrubbing
By far the easiest and least time-consuming way of cleaning your tapes is by doing so while it's inside of a VCR- or rewind-scrubbing, as I like to call it. There are multiple ways of going about doing this, but the core idea is that you scrub the entire tape as it's rewinding or fast-forwarding. This is a very fast and reliable way of doing things, and while it's not as thorough as hand-scrubbing a VHS, such a downside can be easily circumvented by repeating the steps multiple times.
 |
| Check out my slick chassis. |
Please note that I will be assuming the usage of a microfiber cloth throughout these instructions, as that's what I always opt to use, but you could probably switch it out with some other utensil like a Q-Tip or a cotton ball.
It's An Inside Job
First things first, you'll need a machine- like I said, I'd suggest having a 2nd VCR on-hand, but either way you'll need a VCR. You'll need to set it up wherever you're working, and remove the top cover using a Philips screwdriver. This process differs from machine to machine, so unless you have a service manual on-hand you'll have to figure it out on your own probably, but generally it's pretty straightforward and involves removing a few screws on the back, sides, and sometimes the bottom of the machine. Make sure you keep track of your screws and where each of them went so you don't lose any or forget what holes they went to.
 |
| Autopsy of a VCR. The silver circle is the tape drum and the two things beside it are the guides. |

Now that we're inside the machine and know the most important components, it's time to finally get to work cleaning. First, put the tape into the player and immediately press the stop button. This is because most home video tapes will automatically start playing once you put them in, which we don't want to happen, so stop it right away. Once the tape is loaded, the two guides will start moving and pull it upwards so it's rubbing against the spinning drum, which is the optimal position for our cleaning method.
In A Pinch? Pinch!
Next, we take our microfiber cloth and get it wet with isopropyl alcohol. I find the best way to do this is by pouring it into the bottle cap and then pouring it from the cap onto the cloth; alternatively, you could find a way to dip the cloth somehow, though I feel it'd be a bit more of a pain. You can also just dunk the alcohol all over the cloth, but I mean... come on, don't be wasteful. I would recommend ringing the cloth out a bit after getting it wet, as you don't want to make too big of a mess.

I'd advise being very careful here so as not to crinkle the tape too terribly, but it's not too big of a deal as long as you don't completely jostle it. Additionally, be sure not to pinch the tape too hard. Not only could you possibly crinkle it as described above, but pinching it too hard will slow it down while rewinding/fast-forwarding, so just try to be careful. The position you do it in really depends; I usually hold the tape on the right side right by the drum (see picture), where there's a good amount of space for the cloth to rest and I can easily switch arms if one gets tired, but there's also a bit of space on the left where you might be able to do it.
Now It Starts Getting Dirty
The next part depends on whether the tape is rewound or not- you'll either be fast-forwarding or rewinding. We'll assume the tape is entirely on the left side (meaning it's at the very beginning), meaning we'll start by fast-forwarding, but your tape might be halfway or partway through, in which case you can start either way. Regardless, we want to press the fast-forward button and lightly pinch the tape with our cloth as the tape moves to the right. This process will probably take a while depending on how long the tape is, so if your arm gets tired, feel free to briefly stop the tape and switch hands.
As a reminder, don't pinch the tape too hard, otherwise you'll stop it from fast-forwarding and slow things down. Additionally, the tape might struggle anyways if there's a lot of mold on it. If this does happen, stopping the tape for a second and starting the fast-forward again usually gets it back moving. If it still struggles to keep moving, try both cleaning the drum off and wiping that part of the tape by-hand- processes which I'll detail further down.
It's A Clean Machine
Once the tape gets to the very end, remove the cloth and hit the stop button twice to eject the tape. The reason for hitting it twice is because most VCRs automatically start rewinding at the end of a tape, and you want to make sure to clean the drum and guides quick before picking up on things again. Before you do this, I suggest you unplug your VCR in order to avoid any complications.
Cleaning the tape drum could not be easier- all you need is a thin strip of paper dunked in the isopropyl. You take the piece of paper, stick it onto the drum, and spin the drum around a few times so that you wipe it good with the paper. As for the guides, you can probably just get them with the cloth. After you do this, you'll want to let everything dry off, otherwise the tape will slip on the drum and get "eaten", as they say.

Rinse, Rewind and Repeat
Now that we've got a clean, mean, cleaning machine again, we can plug it back in, insert the tape, and repeat the same process again while rewinding. This is pretty straight-forward- you do the exact same process of pinching the tape as it moves, except in the reverse direction. I guess this isn't necessary, but we want to be as thorough as possible to ensure that the mold doesn't grow back at any point.

After rewinding, take the tape out and clean the drum/guides again. By now, you've undeniably noticed just how much cleaner your tape looks. Pretty insane, right? You can stop here if you really want, but I'd recommend repeating the fast-forward/rewind cycle one more time to be safe. Again, you want to ensure you're as thorough as possible, so I always opt to run through the tape twice or even thrice to make sure I get it as good as I can.
Going Even Deeper
I've described the entire automatic cleaning process at this point, but if you're doing this, you're going to want to take the tape itself apart and clean the casing off. I know, I know, you don't want to, but chances are the mold has gotten all over the inside parts as well as the reel itself, so I consider it a necessity to actually go inside the tape and give everything a good wiping.
Taking a VHS apart isn't complicated, but it's a bit of a pain in the prostate- you just unscrew the five screws on the back, then |
| Take these 5 screws out so that you can take the shell apart. |
Now that you're inside the VHS itself, wipe everything well with the cloth and the alcohol. Anywhere that there's grime or dust, wipe it off. Ideally, you should do this with not just the shell itself, but also the spools that the tape are wrapped around. Getting the inside of the spools wiped is kind of a pain, but I'd really suggest doing so as mold easily forms there as well as on the tape itself.

Side note: you hopefully won't have to take the entire reel of tape out of the casing, but there's a chance you might depending on how much gunk there is. Also, if you do, then that sucks, because putting it back in is a pain in the ass. You have to make sure it's positioned just right in between the little guiding cylinders- on the left side, it sort of snakes in between them, and on the right it just kind of goes right through. Basically, look at the pictures to figure it out.
Another side note- the tricky thing about the spools is that there will probably be residue no matter how well you wipe it. This will make the tape look dirty even after all of your work cleaning it, but don't worry- it's really just scarring from the mold, and shouldn't cause any real trouble (or reel trouble :P).
Recap
So, to recap all of the above information, here's a condensed list of instructions you ideally want to follow:
- Remove the cover of your VCR
- Put the moldy tape inside and stop it from playing
- Get cleaning cloth wet with isopropyl alcohol and "pinch" the tape with it
- Rewind or fast-forward while pinching the tape with two fingers
- Stop and eject the tape
- Unplug VCR, clean the tape drum and guides
- Take the tape apart and wipe the shell/spools
- Put tape back together, plug VCR in
- Repeat steps 2-7 as needed depending on desired thoroughness
- Put VCR back together and test tape out; if it doesn't work, then BACK TO THE GRIND!
I didn't really talk about step 10, but I feel it's a bit of a no-brainer; after you finish cleaning, you'll want to test it out and make sure you did a good enough job. If it plays from start to finish, then you're probably fine. If the video slowly fades to complete static and a message appears saying that your VCR might be dirty, your work ain't finished, bucko.
Alternative Methods
As I strongly implied, my method of rewind-scrubbing is not the only way of doing it. I wanted to include this section because there's another popular method which pretty much involves rigging your VCR with Q-Tips to automatically clean the tape, taking out the factor of hands.
Undeniably, this method has benefits- it's probably faster, and evades the risk of messing the tape up with your hands. It just takes a bit of extra effort, since you pretty much have to cut a Q-Tip in half, dunk both sides in alcohol, and stick them into the machine so that both sides of the tape are cleaned well by the Q-Tips. If you're interested in this method, I won't go into detail as I've never tried it, but there are tons of tutorial videos on YouTube which will carefully guide you through how to do it.
For Those With Patience
The method I just described is, undeniably, the most convenient method of cleaning a VHS tape. However, if you want to do so more thoroughly, and have a ton of time on your hands, you can clean a tape off entirely by-hand.
Doing so pretty much requires most of the same materials, save for the VCR- you'll need a cleaning utensil, a solvent such as isopropyl alcohol, and preferably gloves. On top of this, you'll want a couple of pencils. Well, OK, they don't have to be pencils, but they should be long, thin, stick-like objects of a similar nature. Pens, pencils, markers- anything that works for the job, which I will describe below.
One of these items will be used to prop the protective flap open- you want to press the button on the side to move it out of the way, and then put the pencil, pen, etc. in the in-between space of the flap so it keeps it out of the way and leaves the tape itself exposed. This is, of course, so that you can get to the tape more easily when cleaning it.
The other pen or similar object will be used to press a small button on the back of the VHS which allows you to pull the tape out. This button is in the very center of the VHS casing, and when you push it, you can grab the tape from below and pull an excess amount of it out for cleaning. This will allow you to clean a larger volume of tape at a time, which will then be wound back up using the white, screwy things on the back.


The process for this is very straight-forward; with the flap propped open, you want to press the button down, pull a bit of tape out, and wipe it down well with the cleaning device. Afterwards, you wind the tape back up by screwing one of the white things on the back, specifically the one opposite to whichever side you pulled the tape out of. When you wipe it down, you want to do it
in a forward-only motion (not back-and-forth) a few times, and make sure you get both sides of the tape. Regardless, you'll want to do this for the entire tape, start-to-finish, in order to make sure you get the entire thing.
 |
| Unintentional cameo time!!! |
Alternatively, if you'd like, you can take the VHS apart and pull the entire reel out of the shell, which allows you to clean the tape by rolling it as desired. This works just as well as keeping the VHS intact, but you have to be more careful in order to not mess the tape up at any point. It also involves taking the reel out and putting it back in, which is not the simplest task as I described earlier.
Be Warned, Tapehead...
If this sounds like an absolutely tedious, monotonous, soul-destroying process, then that's because it is. Cleaning a tape by-hand is one of the most taxing things I've ever done, period. We're talking several feet of tape, all of which needs to be scrubbed methodically and slowly over the course of hours, and it's even worse when you're doing it in your bathroom during the summer. Maybe it doesn't sound that bad, but if so, you probably don't realize just how long this takes.

It took me 4 hours to clean by hand.
I'll say that again in case it didn't soak in: the process of cleaning a 15-minute VHS tape by hand, from start to finish, took a total of roughly 4 hours. FOUR. That's 240 minutes of standing in a sweaty bathroom, gloves on, shirt off, wiping away at a VHS tape as you question whether any of this is worth the time.
The worst part is, after I finished doing this, I finally put the seemingly-clean tape into my machine, and lo-and-behold, it still didn't work. My VCR got dirty and stopped working, and I ultimately had to buy a new one because I was afraid to take it apart and the cleaning VHS I tried to use ended up just breaking it even more.
Fortunately, the tape now works just fine from start to finish, but with a lot of noticeable wear. The video is filled with scratches and static lines, and one spot in particular during the credits of Luxo Jr. ALWAYS struggles, though it plays better or worse depending on what machine you use it in. This, of course, is in all likelihood partially just normal wear like I outlined at the beginning of this tutorial, which makes sense considering that it's over 30 years old at this point. Another thing that actually dawned on me while writing this is that it may also be due to the back-and-forth wiping motion I used, which I read somewhere can wear away at the magnetic layer of the tape and make it less readable. I also fumbled the tape really badly at one point, which I'm pretty sure crinkled it leading to the one segment I mentioned struggling to play.
Basically, the takeaway I want you to have with this story is that if you're going to clean a tape by hand, realize that it will be a very long and careful process. More so just long, because I'm pretty sure crinkled tape straightens out the more you play it (that's speculation, don't quote me on that), but if a tape clocking in at a quarter-of-an-hour took me 4 hours to clean, imagine how long a typical movie will take you. That's 1410ft of magnetic tape packed into a single plastic container, all of which you're gonna have to slowly clean from one end to another. Only do this if the tape in question is too caked to even play in a VCR; otherwise, it probably isn't worth your time.
Failures Lead To Successes
 |
| Before... |
My next project following the Pixar tape was several months later with a mold-ridden copy of the Sonic the Hedgehog movie. No, not the Jim Carrey one, but the animated movie from the 90s which was actually a two-part OVA series, combined into one feature and distributed internationally by A.D.V. Films. I bought this relatively valuable tape on eBay for around $15 from a seller who noted the case being cracked but failed to mention (or probably notice) that one side of the tape had some serious mold problems. I would've asked for a refund on this, but it was $15 for a tape which traditionally goes for $60-70 online, so it felt about right anyways.
 |
| ...and after! |
This actually ended up sitting in my room for a few months, until one day I decided to take a shot at cleaning it. Considering that this was my first time using the rewind-scrubbing method, it went pretty well, and the tape now plays beautifully, albeit with a few tiny snags in between which are perhaps from not handling the tape carefully enough.
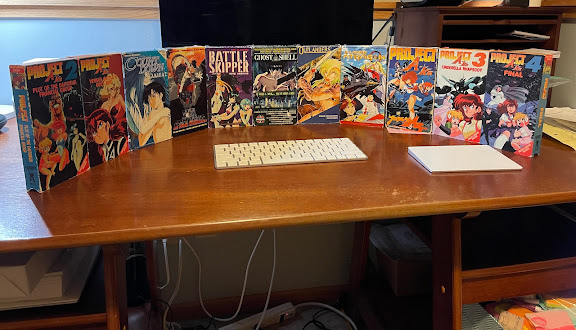
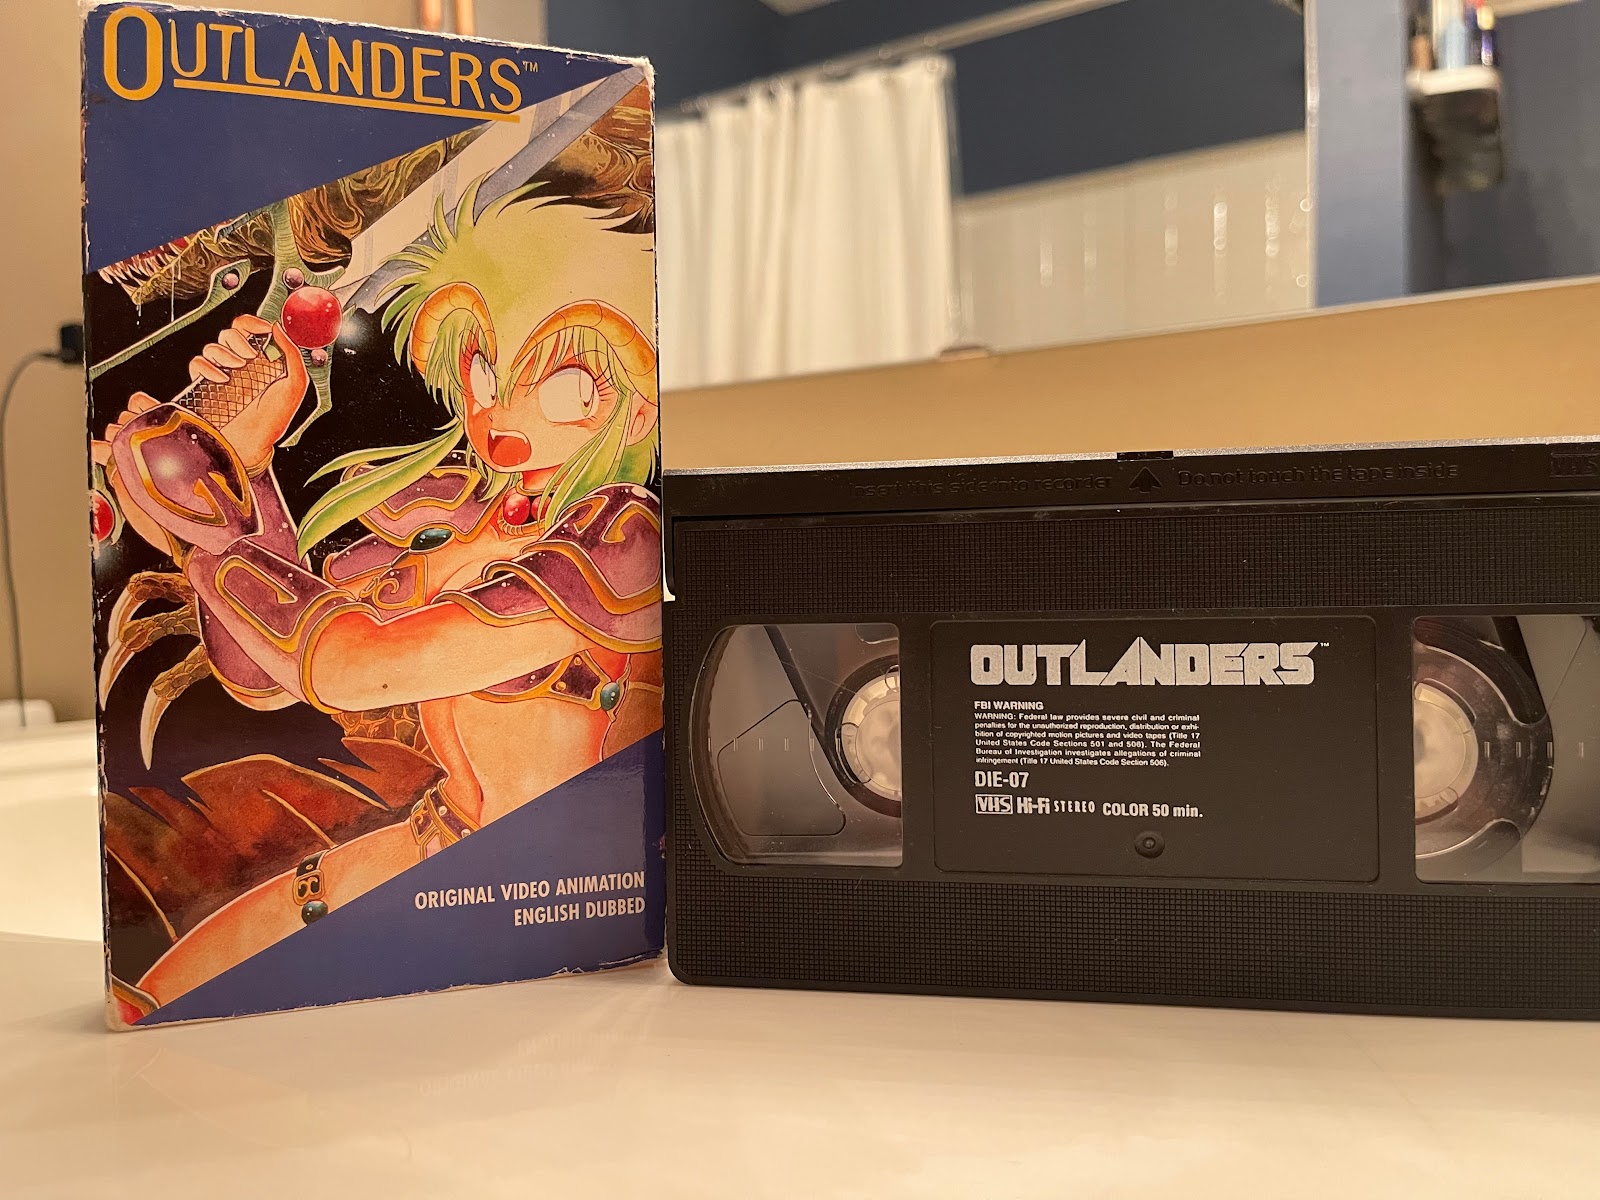
Since then, I've secured a large number of other anime tapes which I'm actually still in the process of cleaning. Among these are the exceedingly rare VHS of Outlanders, every single Project A-Ko film as well as the first Versus OVA, and the dub of Ghost in the Shell, which is also the only one that I'm definitively not planning on selling. As a whole, this has gone very well so far; the first A-Ko tape struggles a LOT at the beginning, with the sound flip-flopping between being way too quiet and plagued by a horrid crackling sound, but gets better as it goes along. As always, I'm positive that this isn't due to isopropyl damage but rather damage from the mold combined with normal wear. The others I've cleaned so far play extremely well for the most part, including Outlanders, which (wink, wink) I have up as the cheapest listing on eBay if you're interested.
Conclusion
Well, there you go- I'm not sure how many people will view this tutorial, but for anyone who has, you know have a semi-comprehensive idea of how you can clean dirty VHS tapes in more ways than one. It might seem like an ambitious process in some ways, but it really isn't all that bad once you've practiced it a number of times, nor is it even so bad the first time you try it. Perhaps this information will come in good use to you; perhaps you'll never have a use for it at all, but find it interesting nonetheless; or perhaps you found this to be a complete waste of your time and energy and will never read any of my blog posts again. Either way, I hope you came out of it having learned something new.
_____________________________________________________________________________
Ok, that's all for now. I hope you enjoyed! I've been fairly busy lately, but expect another couple of posts in the next week or so. I want to write one about my recent haul while thrifting with a good friend of mine, as well as another one about a couple of blank VHS recordings I secured with some Disney Channel stuff on them. Until then, I'll see you next time!
Cheers,
~Tristan
Comments
Post a Comment